Thursday, January 7, 2016

How To Update Your Tecno H6 To The Latest Rom To Get 5gig Storage Space

Tecno H6 Latest Firmware/ Version 5g [Stock Rom ]

Tecno H6 Firmware


To all Tecno H6 users, this post was specifically made for you guys. I assume we all know that Tecno H6 is of two version or type, the OLD VERSION/ FIRMWARE:  Build Number: H6-G325-20140923 has 2gb allocated free space for use and also the NEW VERSION/ FIRMWARE: Build Number: H6-G325-20150122S which comes with 5gb free space for use. Well, To get this new version Rom on your phone you will have to flash the new update Note: Your data will not be lost however, we would advise you to take a backup before proceeding to the following steps


Frequently asked questions:

 ANY BUG?
  • Not at all, everything's working perfectly.
IS IT A CUSTOM ROM?
  • NO, it's Tecno H6 official latest stock firmware/ version.
WHAT'S IS THE NEW FIRMWARE/ VERSION?
  • 5gb free space for your use and other noticeable changes

STEPS.
1.Download  Tecno H6 Stock Rom Download Android Driver  and SP Flash Tool For flashing the Update
Do This First Before Flashing Rom ( Install Preloader Usb Vcom Drivers On Your Pc)
2. Unzip the downloaded files. You can use software's like WinRAR or 7Zip to do that, if required.
3. Open “Android Driver” and double click on
4. If your phone is connected to the PC via USB, remove it before proceeding to the next step

5. Open folder named “Flash Tool” and double click on “Flash_tool ” application file.
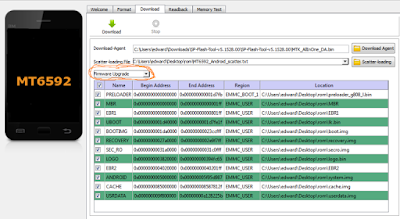
7. Select “Scatter-loading ” option on the tool.
8. Select file named “ MT6582_Android_scatter ” from the firmware folder

2.thumb.PNG.8b8b13e6a855b5fb5ec3ae5987b5

9. Click on “Firmware-Upgrade ” option on the top as shown below & then select Download

3.thumb.PNG.82027f768ecc99c3ff07f7b8009a

10. Connect your  Tecno H6 with the USB cable provided by “ Tecno H6”, make sure your device is switched off before establishing connection with more 50% battery backup.
11. The upgrade process will be triggered and you would be able to see the following screen.
5.thumb.PNG.73136051fc9b6b4f63440e02ee50
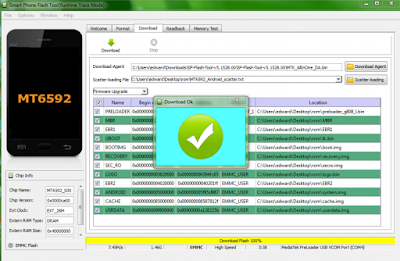
12. The following screen will appear, on completion of the upgrade.


6.thumb.PNG.afc4262bee4eb7c91e486012067f

CAUTION: DO NOT disconnect/ try to switch the device on while the upgrade is in progress.
13. Disconnect device and switch on your device again. Congratulations! You are now using the NEW VERSION/ FIRMWARE: Build Number: H6-G325-20150122S


Thank for visiting  Your comment will make us serve you better Don't forget to hit the share button.

How to install Preloader USB VCom Drivers MTK65XX On Your Pc

Install MTK65XX Preloader USB Vcom Drivers for SP Flash Tools in Windows
Day in day out guys flash their Android phone which get bricked due to one problem or the other Generally many users face the problem of VCom drivers not getting installed for their MediaTek device which will make your Sp flash not to response well when you want to flash your android, we require VCom drivers to be properly installed  when we want to flash firmware/Rom in our device with SP Flash Tools or any other similar tool. we will getting the best and easy way to install the VCom drivers

This Guide works with Windows XP, Vista and Windows 7 Based Operating systems,

How Best To Install USB VCOM Drivers :-  
  Step 1 :- You need to Download MTK USB VCOM Drivers for you device model click the below link.
MTK6582 /MTK6592 /MTK6589 / MTK6577 or any other MTK65XX

Step 2 :- Now open Device Manager in your PC by clicking the window button and typing the device manager

Step 3 :- In Device Manager click on your PC name and then click on Add legacy hardware, as see below screenshot.

VCOM Drivers
Add legacy hardware
Step 4 :- Now in Add Hardware Wizard click on Next to continue as see below

Preloader USB VCom Drivers MTK65XX
Step 5 :- Click the Install the Hardware that i manually select from a list (Advanced) 
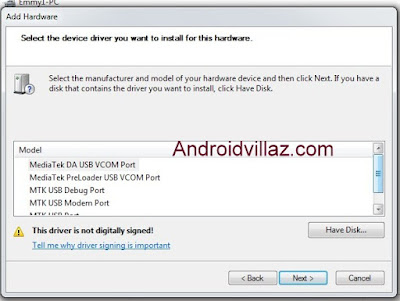
Step 6 :- It will Show All Devices Click the Next button to continue.
 
Step 7 :- Click the Have a Disk button  now browse to the Vcom drivers you download make sure you have extracted it out from the zip select the inf file according to your PC bits the first inf file is for 32bit system while the second file is for 64bit then click open next click Ok.
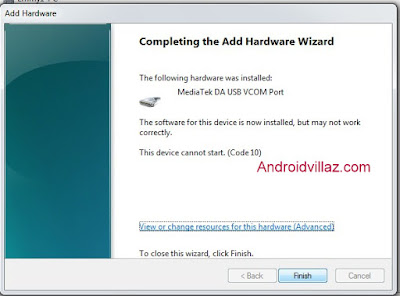
Step 8 :- Now click on Next on the wizard to install the drivers and when promoted for security issue just click on install any anyway to finish the driver installation.
Preloader USB VCom Drivers MTK65XX On Your Pc
Step 8 :- It will install Drivers after that you will be ask to click finish and restore to make the drivers works
How Best to install Preloader USB VCom Drivers MTK65XX On Your Pc

Congratulation you have successfully install VCom drivers in your pc you can now flash your firmware/Rom via Sp flash without getting any problem

How to Root Infinix Hot Note & Hot Note Pro 5.1 Lollipop


This tutorial will be helpful for those who have updated Infinix Hot Note or Hot Note Pro to lollipop who want to root their device again.
I want to believe that you already have all the files so long you are running 5.1 Lollipop on your hot note or pro device.

Requirements

==>SP Flash tool
==>Recovery Image (download here)
==>Super User SU (download here)
Procedures

==>Copy and extract the downloaded YP recovery.rar   on your PC
==>Copy the SuperSU to your SD card
==>Open your SPFlash tool and click on Scatter loading
==>Locate where you extracted the recovery you downloaded earlier on your pc and load the scatter file
Choose download only (See image below for guide)
Click on download (wait for the process to complete)
==>Unplug your phone and boot into recovery by pressing Volume UP+ Power or VolDown+Power until you see Philz Touch Recovery.
==>Click Install Zip from SD CARD.
==>Install the UPDATE-SuperSU-V2.46.zip you placed on your sd card earlier.
==>Reboot System Now

Congratulations! Your device is now rooted. If you are still confuse, please use the comment box below.

Infinix Hot Note Users - Infinix Releases Beta Lollipop Rom For Hot Note

Infinix mobility started rolling out the beta Lollipop update for Infinix Hot Note users as promised earlier. The update comes with Android Lollipop with a brand new UI that Infinix call XUI

The update brings new features and some improvement to the Infinix Hote Note device…
The new software comes with a refreshed user interface called XUI Beta, below is the full feature
 
1. Optimized UI display, XUI first beta release,
2. Added font management, theme management, online wallpaper function,
3. Added ultra power save function,
4. Added clear application function,
5. Video player added,
6. Optimized system performace,
7. Fixed issues,
8. Support OTA upgrade from 0730

Before You Upgrade Your Hot Note to Lollipop Via OTA
==>If you are upgrading via OTA update, first of all Backup  your device if its rooted
==> Unroot your device
==>Restore to factory setting (not too compulsory)
==>finally update your device.

Where Can I Download The Rom?
Download The Hot Note Lollipop Rom here or from Infinixmobility
How to Upgrade Infinix Hot Note to Lollipop Through SP Flash Tool


Requirements before proceeding.
1. Vcom port driver==>Click here to download
3. Latest Sp flash tool==>Download here
4. A pc with healthy usb port and your infinix usb cable and full charge.
5. Obviously the infinix phone which should have a 90% charge.
6. Back up your files and contacts
==>INSTALLING VCOM DRIVER
1. Extract the downloaded vcom driver.
2. Go to device manager>click action>click add legacy hardware
3. Under welcome to add new hardware click next
4. Select advanced option and click next
5. Select ‘show all devices’ and click next.
6. Click have disk
7. Browse to your vcom extracted folder and select the driver setup up file and click    
open, then ok.
8. Select Mediatek preloader usb vcom driver and click next.

==>GET YOUR PHONE READY
1. Make sure phone has about 90% charge as well as your pc.
2. Enable usb debugging under settings>developer options
3. Connect to Pc…ignore any driver failure warnings.
==>FLASHING

1. Navigate to the sp flash tool folder
2. Run the sp flash tool.exe as admin
3. Click on scatter loading. Navigate to the infinix rom folder and select the scatter file.
4. Click on download. Restart your phone using the power button and wait. The phone
will be upgraded on booting-Make sure you don’t tamper with usb at this point.
5. The final result after about 5-10 min should be like this if all went well.
6. After that confirmation close flash tool. Disconnect phone and switch it on.
It will take some minutes before the setup is complete.

[Latest] Dual Whatsapp GBWhatsApp+ Plus v3.50 Xtreme apk

GBWhatsApp v3.10 APK

GB WhatsApp – Dual WhatsApp in One Phone

GBWhatsApp apk is another mod by GB Team that has all the features of GBWhatsApp in it but has the signature “com.whatsapp”.
This mod will suffice all the need that you require from themeing your whatsapp to customizing your privacy.
Enjoy it all in this new ‘GB’ WhatsApp Plus.

Features

  •  privacy options
  • antiban and lock with password
  • possibility to distinguish between collective messages and regular
  • possibility of a lock for Watts in August password
  • the ability to send video size 30 MB instead of 16 MB
  • ​​the possibility of sending 90 image at once without 10
  • possibility of a case of the number of dependent characters 250 instead of 139 symbols
  • the possibility of pressure on the links without storing the message sender or the number of the owner
  • counter statistics for groups
  • View the media without loading
  • the possibility to hide the name and the date when copying two or more
  • ability to copy case
  • the possibility of changing the program format, and change the program icon and notices
  • and many more feature
What’s New ?
  • Add widget to hide and show Appear to become connected to
  • add more than 7 new forms of bubble conversation and Sahan receiving and reading
  • Add 02/02/31 option to change your online color now in talks
  • Fixed a problem disappearance appearing in Conversation
  • reform not to open the conversation in 8 option
  • Other reforms
How to Install ?

  1. Download and install the APK given below
  2. Don’t need to uninstall original whatsapp and start using original and gbwhatsapp together
  3. After that complete the setup and start using it. Enjoy ! :)
Download Links: GBWhatsApp Plus v3.50 Xtreme APK

Screenshots
GBWhatsApp v3.10 APK

Saturday, December 19, 2015

Etisalat Unlimited Free Surfing On Android Device With N0.0 Via Psiphon With Magic IP

Guys, it is time to forget about Etisalat Social/Chat Pak subscription. Now you can surf free with your Etisalat sim with N0.0, no subscription required, all you need is Magic IP's with Psiphon and the browsing speed is more preferable than Etisalat Social/Chat pak. It works better for streaming and downloading. Simply follow the steps below carefully to get it rolling.

Magic IP's Setting For Etisalat Unlimited Free Browsing Via Psiphon
» First of all, Download New version of Psiphon Handler from here.
» Install it on your Android Device

Create New APN settings On Your Phone As Follows:
» Open your phone settings > Go to more > Go to mobile network > Go to access point names > Select Mtn, Then create new APN and configure as shown below:
» APN Type: default
» APN: etisalat
» Proxy: Blank
» Port: Blank
» Save And Activate it as your default settings

Then Launch Psiphon Handler, in the handler menu:
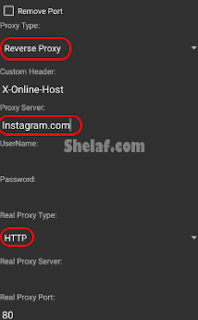
» Proxy type: Reverse Proxy
» Proxy server: instagram.com
» Real Proxy type: HTTP
» Real Proxy server: (leave it blank)
» Select save and click on “tunnel whole device”.
Click on the option tab
» Region: select, USA Server
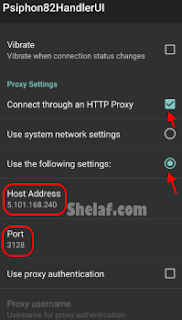
» Select more option, And check “Connect through an HTTP” then select “Use the following settings:” then configure as.
» Host address: 5.101.168.240
» Port: 3128
Save and Click Start, then wait for atlest 10-20minutes

Note: It usually takes time to connect, like 10 to 20mins. So, you need to exercise patient before it shows connected. Once the Psiphon connected, you will feel the speed especially when streaming and downloading.

Magic IP Update For Etisalat Unlimited Free Surfing On Android Device With N0.0

Three days back, I made a post on how to surf unlimited for free with etisalat sim. From the comments, I can see that some fans are not yet enjoying the tweak, due to the fact that the tweak is taking time to connect and lots of people can't exercise patient for it to connect. For those that are still complaining, below are 4 currently working Magic IP's, tested and confirmed working. Use any of the IP's with its Port to connect and surf with N0.0 via Psiphon and Etisalat sim.

Note: This tweak usually takes time to connect, like 5 to 10mins. So, you need to exercise patient before it shows connected. Once the Psiphon connected, you will feel the speed, especially when streaming and downloading.

Use any of the Magic IP in the table below to surf unlimited for free with better speed on your Smartphone.

Magic (IP)           PORT
37.187.1.118        3128
149.202.56.98  8888
5.101.168.240   3128
79.120.72.222   3128

In your Psiphon under Proxy Server, you can use;
instagram.com or mobile.etisalat.com.ng%2F%3a@41.73.228.136
Other setting still the same.
If you are new to Magic IP's tweak, kindly check out this: #link